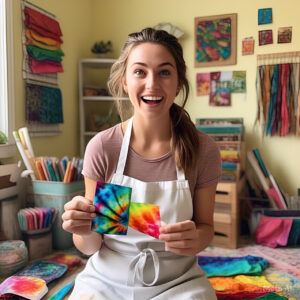
I will guide you through the world of tie dye, exploring various tie dyeingtechniques and patterns that can be achieved with this versatile craft. Whether you’re a beginner or an experienced artist, you’ll discover the satisfaction of creating one-of-a-kind pieces that reflect your style.
Learn the basics of tie dyeing techniques and their history
Understand the techniques for creating unique designs
Discover how to achieve various patterns with tie dye
Explore the therapeutic and creative benefits of tie dyeing
Create one-of-a-kind pieces with tie dye techniques
Historical Context & Current Trends
Tie-dye has a rich global history dating back thousands of years, with roots in India, Japan, Indonesia, and West Africa. Modern tie-dye as we know it in Western culture gained popularity during the 1960s counterculture movement, when it became a symbol of peace and free expression.
According to recent market research, tie-dye experienced a massive revival during 2020, with interest in “tie-dye loungewear” increasing by 5,000% compared to the previous year (Oprah Daily, 2020). The trend has continued to evolve, with the market showing a 35.2% growth rate over the past 24 months, according to SaleHoo’s 2025 market trends report.
Fashion historian Amber Butchart explains, “Tie dye became a symbol of psychedelia, foregrounding a homemade aesthetic that became a kind of anti-fashion fashion” (Oprah Daily, 2020). Today’s tie-dye revival incorporates both traditional techniques and modern innovations.
Essential Supplies
Basic supplies needed for the various tie dyeing techniques include:
Dyes:Procion MX fiber-reactive dyes are recommended by experts for their vibrancy and longevity, though beginners might start with kits like Tulip One-Step
Soda Ash: For pre-soaking fabric to help dye adhere better
Items to Dye: 100% natural fibers (cotton, linen, rayon, silk) work best
Rubber Bands/Fasteners: For creating resistance patterns
Protective Gear: Gloves, apron, and workspace covering
Squeeze Bottles: For precise dye application
Plastic Covering: To wrap dyed items during the setting time
A Reddit user with tie-dye experience advises: “My tips are use procion dyes, use soda ash, use 100% natural fibers like cotton (not polyester). From there just experiment with folds and dye application techniques” (Reddit r/tiedye, 2020).
To dive into the world of tie dye, it’s essential to understand the foundational steps that lead to a successful dyeing process. The initial preparation phase is crucial for achieving the desired colors and ensuring the longevity of your project.
Preparing Your Fabric for Dyeing
Before starting, make sure you wash all your pieces to remove any manufacturing chemicals or sizing. It’s best to leave your shirts and other pieces damp, as moisture helps the dye saturate the fabric better. Proper preparation is key to a successful tie dye project.
Pre-soaking your fabric in soda ash, a common pre-treatment for fiber-reactive dyes, helps the dye bond permanently with the fabric, ensuring vibrant and long-lasting results.
Popular Tie-Dye Techniques
1. Spiral Technique
The spiral is perhaps the most iconic tie-dye pattern, creating a psychedelic swirl effect. The spiral technique involves folding your shirt into a spiral shape, similar to a pinwheel, and binding it with rubber bands. This creates a beautiful, swirling pattern. To apply dye, you can use a single color or multiple colors to achieve different effects.
How to create:
Pinch a small section at the center of the fabric
Twist the fabric clockwise, keeping it flat
Secure with 3-4 rubber bands crisscrossing over the center
Apply different colors in each “wedge” created by the bands
In a popular YouTube tutorial with over 165,000 views, TulipColorCrafts demonstrates that the key is maintaining consistent tension while twisting to create clean spiral lines.
2. Crumple/Scrunch Technique
The crumple technique is one of the simplest methods to achieve a tie dye effect. Simply crumple your shirt into a compact bunch and secure it with rubber bands. Then, apply dye to different sections of the crumpled fabric to create a marbled effect. This technique creates a random, cloud-like pattern with minimal effort, making it perfect for beginners.
How to create:
Lay the fabric flat
Scrunch fabric randomly into a relatively flat disk
Secure with rubber bands
Apply dyes in different areas
According to Crafty Chica, “This technique is probably the easiest, and it’s great if you want more of a subtle tie dye. You simply scrunch the t-shirt with your hands until it forms a lumpy mound.”
3. Bullseye/Target Pattern
This classic technique creates concentric rings of color. The bullseye technique is a versatile pattern that creates concentric rings of color radiating from a central point. To achieve this design on a shirt, start by laying it flat and pinching a small section of fabric at the center. Pull this section into a cone shape and wrap rubber bands around it. The spacing of the rubber bands determines the width of the color rings. You can then apply dye in alternating colors for a classic look or use gradient colors for an ombre effect.
How to create:
Pinch fabric at the desired center point
Pull up into a cone shape
Place rubber bands at intervals along the cone
Apply alternating colors between bands
A TulipColorCrafts video demonstrating this technique has garnered over 507,000 views, showing its enduring popularity.
4. Ice Dye Technique
This more advanced method creates a watercolor-like effect using ice cubes.
How to create:
Fold or scrunch the fabric and secure
Place on an elevated rack
Cover with ice cubes
Sprinkle powdered dye directly onto the ice
Let ice melt naturally, allowing dye to penetrate the fabric
This tie dyeing technique has gained significant popularity on social media, with one demonstrative TikTok-style video receiving over 4.3 million views on YouTube.
5. Shibori Tie Dyeing Techniques
This Japanese tie-dye method uses various folding and binding patterns to create geometric designs.
Popular shibori patterns include:
Itajime (fold and clamp)
Arashi (pole wrapping)
Kumo (binding with thread)
A Craftsy YouTube tutorial on basic shibori techniques has over 556,000 views, demonstrating growing interest in this traditional art form.
Classic stripe patterns are a staple in tie-dye designs, offering a timeless and versatile look. Stripes can add a dynamic touch to any garment, making them a popular choice among tie-dye enthusiasts.
Horizontal Stripes
To create horizontal stripes, start by laying the shirt flat. Fold the shirt in a series of horizontal accordion folds. Secure the folds with rubber bands placed at regular intervals. Apply dye to the folded sections, alternating colors for a classic striped effect.
Vertical Stripes
For vertical stripes, follow a similar process, but fold the shirt vertically. This orientation can create a striking visual effect, especially when paired with contrasting dye colors. Make sure to lay the shirt flat and fold it neatly to achieve crisp, clean stripes.
Diagonal Stripes
Creating diagonal stripes involves folding the shirt in an accordion style, starting from one corner. To achieve this, fold the shirt in 1-inch folds, alternating the direction with each fold. Secure with rubber bands every 1 to 2 inches. Then, apply dye to the folded sections, either in alternating colors for a traditional look or in a color-blocked design for a more modern twist.
Advanced Tie Dyeing Techniques
Elevate your tie-dye skills by mastering advanced techniques that allow for greater creativity and precision. As you become more comfortable with the basics, you can experiment with more complex methods to achieve unique and captivating designs.
Shibori-Inspired Folding Methods
Shibori-inspired folding methods involve intricate folding and binding techniques to create resistance areas on the fabric, resulting in distinctive patterns. By folding the shirt half lengthwise and applying various folding techniques, you can achieve complex designs that are both visually striking and nuanced.
Mandala and Kaleidoscope Patterns
Creating mandala and kaleidoscope patterns involves precise folding and binding to achieve symmetrical, intricate designs. These patterns require patience and attention to detail, as the folding and dyeing process must be carefully controlled to achieve the desired effect. Using a rubber band to secure the folds is crucial in creating these patterns.
Heart and Rainbow Designs
To create a heart-shaped design, start by laying the shirt flat and folding it in half lengthwise. Draw half of a heart shape on the folded edge, then make small accordion pleats along the line, securing with a rubber band. For a rainbow design, use a similar method but with a curved shape. When applying dye, consider using a traditional rainbow color order to enhance the recognizable shape.
Design Type
Folding Technique
Dye Application
Heart
Accordion pleats along a heart shape
Single color or multi-color
Rainbow
Curved accordion pleats
Traditional rainbow colors
Mandala
Symmetrical folding
Multi-color, radial pattern
By mastering these advanced tie dyeing techniques, you can create unique and personalized designs that showcase your creativity and skill. Experimenting with different folding methods and dye applications will help you achieve the desired effect and expand your tie-dye repertoire.
For those looking beyond basics, Reddit discussions indicate a strong interest in more complex patterns:
Mandala Patterns: Created by folding fabric into wedges and applying dyes strategically
Geode Designs: Using ice-dye techniques with specific color combinations
Kenney Style: Complex geometric patterns requiring precise folding and binding
Advanced tie-dyers often use alternative binding materials. As one Reddit user notes: “Zip Ties & artificial sinew have taken my folds to the next level. Sure, I still use rubber bands as well, but those two tying agents stepped up my game for sure!”
Creative Color Application Methods
Creative color application is a crucial aspect of producing visually stunning tie-dye designs. By experimenting with different techniques, you can achieve a wide range of effects that enhance your fabric’s aesthetic appeal.
Ombre and Dip Dye Effects
Ombre and dip dye effects are popular techniques used to create gradual color transitions on fabric. To achieve an ombre effect, you gradually transition from one color to another, typically from light to dark. Dip dyeing involves submerging parts of the fabric into a dye bath to create distinct color sections. Both techniques can produce striking results when executed correctly.
Ice Tie Dyeing Technique
The ice dyeing technique involves using ice to facilitate the dyeing process. By placing ice on top of the folded fabric and then sprinkling dye powder over it, you can achieve unique, subtle color effects. As the ice melts, it disperses the dye throughout the fabric, creating soft, blended colors.
Container and Marbling Methods
The container tie dye technique is a mess-free method that allows for unique color interactions within a confined space. It involves placing the fabric and dye in a transparent container, enabling you to observe the color flow and interaction. Marbling is another technique that creates swirled, fluid patterns on fabric, inspired by traditional paper marbling arts.
From socks to home textiles, tie dyeing offers a wide range of creative possibilities. You can dye all sorts of fabric items, like cotton shirts, sweatshirts, socks, and even shoes! Just make sure the items you buy are made with 100% natural fiber (like cotton or linen) for the best result.
Tie Dyeing Techniques for Socks and Small Accessories
Tie dyeing socks is a fun and creative way to give new life to your footwear. To tie dye socks, start by choosing socks made of 100% cotton or natural fibers. You can use various folding and binding techniques to create unique patterns.
Tie dyeing home textiles like pillowcases, curtains, and tablecloths can add a personal touch to your home decor. When working with larger items, consider your workspace and the amount of dye needed. You can adapt tie dyeing techniques to suit different types of home textiles based on their size and function.
Mastering the Art of Tie Dyeing Techniques
The art of tie dyeing is a nuanced process that requires patience, practice, and a deep understanding of color theory. To achieve high-quality results, it’s essential to consider several factors, including the type of fabric, the dye used, and the processing time.
Color Theory for Tie Dye Projects
Understanding color theory is crucial for creating visually appealing tie dye designs. The color wheel is a valuable tool that helps in selecting harmonious colors that complement each other. For instance, choosing analogous colors can result in a smooth, cohesive design, while contrasting colors can create a bold, eye-catching effect.
Achieving Vibrant, Long-Lasting Results
To achieve vibrant, long-lasting results, it’s critical to follow a meticulous dyeing process. After applying the dye, let the fabric sit for 6-8 hours to allow the dye to set properly. Then, rinse the fabric gently and wash it separately in hot water to remove excess dye. As I did, washing the fabric on an express cycle can be effective. Proper care, including separate washing for the first few washes, helps maintain the color intensity and ensures that the tie dye results remain vibrant over time.
As emphasized by experts, “The key to successful tie dyeing lies in the details, from preparing the fabric to the final washing and drying stages.” Properly caring for tie-dyed items is essential to preserving their appearance.
Troubleshooting Common Tie Dyeing Technique Issues
Color Bleeding/Muddy Results:
Ensure colors are placed with sufficient space between them
Use color theory to plan placement (complementary colors create brown where they meet)
Allow proper setting time (minimum 6-8 hours, preferably overnight)
Fading After Washing:
Pre-soak in soda ash solution
Use a color fixative like Rit ColorStay
Wash in cold water the first few times
Hang dry instead of using dryer heat
Fabric Not Taking Dye:
Pre-wash fabric to remove sizing and chemicals
Ensure fabric is damp but not soaking wet
Check fiber content (natural fibers work best)
Use the proper dye for the fabric type
Case Study: Tie-Dye as a Business
According to The Strategist, many crafters have turned tie-dye hobbies into successful side hustles. One featured artist notes: “My friends started to ask me about where I got my new tie-dyed wardrobe, and soon enough were commissioning me to dye things for them.”
With tie-dye products selling for $10-$25 on average (SaleHoo, 2025) and premium designs fetching $500+ according to Reddit discussions, there’s significant economic potential in mastering these techniques.
FAQ’s – Tie Dyeing Techniques
What is the best way to fold a shirt for tie dye?
To achieve unique patterns, I recommend folding my shirt in various ways, such as the accordion fold or spiral fold, before applying rubber bands.
How do I prevent colors from bleeding during the tie dye process?
To minimize color bleeding, I make sure to use the right amount of dye and follow the instructions on the dye packaging. I also ensure that my fabric is properly prepared and rinsed after dyeing.
Can I use any type of rubber band for tie dye?
I prefer using high-quality rubber bands that are designed for crafting, as they provide the best resistance and help create distinct patterns on my fabric.
How do I achieve a rainbow effect on my tie dye shirt?
To create a rainbow effect, I apply different colors of dye in a specific order, usually starting with red, followed by orange, yellow, green, blue, and violet. I also experiment with different folding methods to achieve the desired pattern.
What is the best way to apply dye to my folded shirt?
I use a variety of methods to apply dye, including squirting, brushing, or soaking. The method I choose depends on the desired effect and the type of dye I’m using.
Can I tie dye socks and other small accessories?
Yes, I can tie dye socks and other small accessories using the same basic techniques as for shirts. I just need to adjust the amount of dye and the folding method to suit the item’s size and material.
How do I care for my tie dye shirt to ensure the colors last?
To keep my tie dye shirt looking vibrant, I wash it in cold water, avoid using harsh detergents, and dry it on a low heat setting. I also consider washing it separately from other clothes to prevent color transfer.
Conclusion
As we conclude our exploration of tie dyeing techniques, it’s clear that this craft offers a world of creative possibilities. By mastering various techniques, from basic to advanced, you can create unique designs and patterns on fabric. The use of different colors, including vibrant rainbow hues and delicate heart motifs, allows for endless expression. I encourage you to experiment with these methods, developing your tie dye style. With practice, you’ll unlock the full potential of this traditional yet innovative craft.
Essential cookies enable basic functions and are necessary for the proper function of the website.
Name
Description
Duration
Cookie Preferences
This cookie is used to store the user's cookie consent preferences.
30 days
Cookie Preferences
This cookie is used to store the user's cookie consent preferences.
30 days
These cookies are needed for adding comments on this website.
Name
Description
Duration
comment_author
Used to track the user across multiple sessions.
Session
comment_author_email
Used to track the user across multiple sessions.
Session
comment_author_url
Used to track the user across multiple sessions.
Session
Google Analytics is a powerful tool that tracks and analyzes website traffic for informed marketing decisions.
Name
Description
Duration
GA_OPT_OUT
Cookies used for functionality allow users to interact with a service or site to access features that are fundamental to that service. Things considered fundamental to the service include preferences like the user's choice of language, product optimizations that help maintain and improve a service, and maintaining information relating to a user's session, such as the content of a shopping cart.
10 Nov 2030
__utmv
Contains custom information set by the web developer via the _setCustomVar method in Google Analytics. This cookie is updated every time new data is sent to the Google Analytics server.
2 years after last activity
__utmx
Used to determine whether a user is included in an A / B or Multivariate test.
18 months
__utmxx
Used to determine when the A / B or Multivariate test in which the user participates ends
18 months
FPAU
Assigns a specific ID to the visitor. This allows the website to determine the number of specific user-visits for analysis and statistics.
session
FPID
Registers statistical data on users' behaviour on the website. Used for internal analytics by the website operator.
session
FPLC
This FPLC cookie is the cross-domain linker cookie hashed from the FPID cookie. It’s not HttpOnly, which means it can be read with JavaScript. It has a relatively short lifetime, just 20 hours.
session
AMP_TOKEN
Contains a token code that is used to read out a Client ID from the AMP Client ID Service. By matching this ID with that of Google Analytics, users can be matched when switching between AMP content and non-AMP content. Reference: https://support.google.com/analytics/answer/7486764?hl=en
30 seconds till 1 year
_gat_gtag_
Used to set and get tracking data
1 hour
_gac_
Contains information related to marketing campaigns of the user. These are shared with Google AdWords / Google Ads when the Google Ads and Google Analytics accounts are linked together.
90 days
__utma
ID used to identify users and sessions
2 years after last activity
__utmt
Used to monitor number of Google Analytics server requests
10 minutes
__utmb
Used to distinguish new sessions and visits. This cookie is set when the GA.js javascript library is loaded and there is no existing __utmb cookie. The cookie is updated every time data is sent to the Google Analytics server.
30 minutes after last activity
__utmc
Used only with old Urchin versions of Google Analytics and not with GA.js. Was used to distinguish between new sessions and visits at the end of a session.
End of session (browser)
__utmz
Contains information about the traffic source or campaign that directed user to the website. The cookie is set when the GA.js javascript is loaded and updated when data is sent to the Google Anaytics server
6 months after last activity
_ga
ID used to identify users
2 years
_gali
Used by Google Analytics to determine which links on a page are being clicked
30 seconds
_ga_
ID used to identify users
2 years
_gid
ID used to identify users for 24 hours after last activity
24 hours
_gat
Used to monitor number of Google Analytics server requests when using Google Tag Manager
1 minute
_dc_gtm_
Used to monitor number of Google Analytics server requests
1 minute
Marketing cookies are used to follow visitors to websites. The intention is to show ads that are relevant and engaging to the individual user.
A video-sharing platform for users to upload, view, and share videos across various genres and topics.
Registers a unique ID on mobile devices to enable tracking based on geographical GPS location.
1 day
VISITOR_INFO1_LIVE
Tries to estimate the users' bandwidth on pages with integrated YouTube videos. Also used for marketing
179 days
PREF
This cookie stores your preferences and other information, in particular preferred language, how many search results you wish to be shown on your page, and whether or not you wish to have Google’s SafeSearch filter turned on.
10 years from set/ update
YSC
Registers a unique ID to keep statistics of what videos from YouTube the user has seen.
Session
DEVICE_INFO
Used to detect if the visitor has accepted the marketing category in the cookie banner. This cookie is necessary for GDPR-compliance of the website.
179 days
LOGIN_INFO
This cookie is used to play YouTube videos embedded on the website.


